
ADVERTISEMENT
Introduction to Homemade Bread
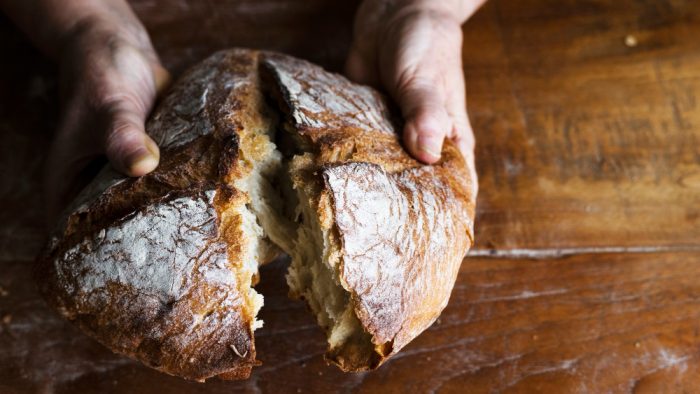
There’s something deeply satisfying about baking your own bread. The aroma of freshly baked bread wafting through the air is a universally cherished experience. In this comprehensive guide, we’ll walk you through the art of making homemade bread, a recipe that has been perfected over generations. This isn’t just a recipe; it’s a journey into the heart of traditional baking.
The Rich History of Bread Making
Bread, in its various forms, has been a staple in human diets for thousands of years. Its origins trace back to ancient civilizations, where the discovery of fermentation led to the development of leavened bread. Over the centuries, bread has evolved, incorporating different grains, techniques, and cultural influences, leading to the diverse array of breads we enjoy today.
Ingredients: The Foundation of Flavor
To embark on this bread-making adventure, you’ll need the following high-quality ingredients:
- 4 cups of all-purpose flour: The backbone of our bread, providing structure and chewiness.
- 1 1/2 teaspoons of salt: Enhances the flavor and regulates yeast activity.
- 1 envelope of dry yeast powder (7 grams): The leavening agent that makes the bread rise.
- 2 teaspoons of granulated sugar: A touch of sweetness to feed the yeast.
- 1 cup of warm water (37° to 42° Celsius): Activates the yeast and hydrates the flour.
- 1/3 cup of oil (preferably olive oil): Adds moisture and richness to the dough.
Step-by-Step Guide to Perfect Homemade Bread
- Yeast Activation: Begin by activating the yeast. In a small bowl, dissolve the yeast and sugar in 1/4 cup of warm water. Ensure the water is between 37° and 42° Celsius – the ideal temperature for yeast activation. Let this mixture sit for about 10 minutes, or until it becomes frothy and bubbly.
- Mixing the Ingredients: In a large mixing bowl or on a clean surface, combine the flour and salt. Make a well in the center and add the activated yeast mixture, the remaining warm water, and oil. This is where the magic begins.
- Kneading the Dough: Knead the dough for about 10 minutes. This process develops the gluten, giving the bread its structure and elasticity. The dough should be smooth and slightly tacky to the touch.
- First Rise: Place the dough in a lightly oiled bowl, covering it with a damp cloth. Let it rise in a warm, draft-free area for about 1 hour, or until it doubles in size. This is crucial for developing the bread’s texture and flavor.
- Shaping the Bread: Once risen, punch down the dough to release air bubbles. Divide it into 6-7 equal portions. Shape each portion into a bun or your desired bread shape. This is where you can get creative – braid, roll, or sculpt as you like.
- Second Rise: Place the shaped dough on a baking tray lined with parchment paper. Cover them with a cloth and let them rise again for about 30 minutes. They should puff up nicely.
- Baking the Bread: Preheat your oven to 400°F (200°C). Place the bread in the oven and bake for 10 minutes, then reduce the temperature to 350°F (180°C) and bake for an additional 20 minutes. The bread should be golden brown and sound hollow when tapped.
- Cooling and Serving: Remove the bread from the oven and let it cool on a wire rack. This step is crucial as it allows the bread to set and develop its flavors.
Savoring Your Homemade Bread
Congratulations! You’ve just baked your own homemade bread. Slice it up while it’s still warm, slather it with butter, and enjoy the fruits of your labor. There’s nothing quite like the taste of bread that you’ve made with your own hands.
Tips for Perfect Bread Every Time
- Always use fresh yeast for the best results.
- Kneading is key – don’t skimp on this step.
- Be patient during the rising process; it’s worth the wait.
- Experiment with different flours and add-ins like seeds or nuts for variety.
Conclusion
Baking bread at home is a rewarding experience that connects us to a rich culinary tradition. With this detailed guide, you’re well on your way to becoming a master bread baker. Remember, bread making is an art, and like all arts, it takes practice and passion.
ADVERTISEMENT
